Cannabis Auto-flowering seeds Guide & Tips

Free the tree content
Autoflowering seeds Guide – What to look out for thumbnail

What are autoflo's? what is the difference with feminized? all your answers

Hi there! You’ve most likely heard of these auto flowering seeds, all you need to do is plant them and let it grow, no worries. But is that really the case?

We decided to try some out and see what they’re all about and also bring you all our learnings here! 🙂
We got 2 Critical + 2.0 Auto flowering and 4 fruits Auto flo, if you want to follow them on a weekly basis check them out here!

What is an auto flowering seed

An auto-flowering seed is a seed genetically modified to flowering by itself, independently of the light cycle.
As you may be aware the marijuana plant bases itself on light periods (called photoperiods) for her phases in life.

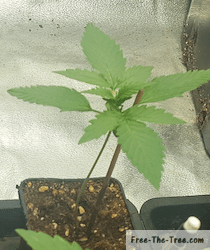
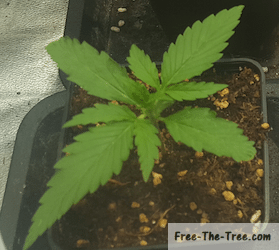
In nature, the Cannabis plant is in its vegetative stage when daylight increases in time. Meaning that while days get longer, they focus on getting bigger and producing leafs, not producing flowers.

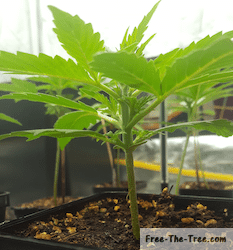
As soon as the daylight starts to reduce in time, the marijuana plant stops focusing on growing and start to produce her flowers, this is what we call the flowering stage.

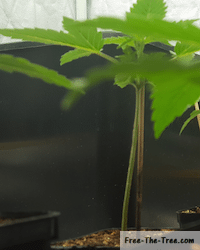
With auto-flowering plants, the flowering stage isn’t based on the photoperiod but on the space is has to grow. What do I mean?
When the main root has reached a blocking point within the soil the plant will start her flowering stage, so be careful!

What are the pro’s and con’s of auto-flowering seeds

The pro’s
  • Short lifecycle and a quicker Harvest
  • More flowering cycles during the year
  • Your plants will be small and compact
  • No change in photoperiod needed. The plant will enter the flowering stage “automatically” (more info below on that).
    This can be helpful especially for outdoor growers.
  • Since these are OGM seeds they generally have better resistance to issues, whether this is heat, cold, nutrient burn, etc
The con’s
  • Smaller plants (a pro for some, con to others).
  • Lower handle on the length of the vegetative stage.
  • Much harder to control when the flowering stage starts.
  • Lighting: Since you don’t have to change the lighting from 16/8 to 12/12, you can keep 16hours of light, increasing your electric bill.
  • Generally auto flowering plants yield less buds.
  • Generally, they also have less THC content than other strains.


Globally, if you’re growing indoor i’d stick with non auto-flowering seeds, switching the timer to 12/12 once you want to get your flowering stage going isn’t that hard. I’m personally regretting doing these right now, all though it allows us to learn about them.

What to look out for when growing auto-flowering plants

So this section is going to be evolving since we currently are in the early flowering stage of ours, so there’s most likely much more to be learned!
Here’s what we got so far:

When to get the sprout into the grow house

The short answer is about a day after your sprouts started to stand up straight. You might want to do a smooth transition, placing your plants in the grow room for a couple hours, then taking them out for a couple hours before placing them in indefinitely.

This is how we tested it out:

We had 6 plants, with a time delay of about 3 days between the first and the last one to break ground. About a day after the last one broke ground we put them all into the grow house.

A month later the result is clear, the plants to break ground the latest are the ones doing the best. 
Now, it’s important to note that the light we had on them while they were out of the grow room wasn’t strong enough making the sprouts grow towards the light instead of growing leaf mass.
This may seem secondary but it definitely strongly impacted their vegetative stage since the plants got top heavy and we had to deal with balance issues

Here’s a couple images to show you the differences:

First cannabis plant to bear ground

Last Marijuana plant to break ground

At this point the late plant had broken the ground for a little over a day. You can see that its stem is a little over 1cm tall, whereas the early plant on the left is already already at least 5cm.

This is when we decided to bring them into the grow house.

Here we just got them into the grow house, you can really see the size difference between both fruit plants.
Notice that on the leaf level the early plant isn’t that much more developed than the late one?
This is due to the fact that the plant used up her energy to grow up to the light instead of growing leaf mass, which isn’t what you want her to do.

At this point about a week has gone by. The leaf mass is pretty similar, although the early plant is now dealing with balance issues whereas the late one has very close knots and growing some nice and big leaves.

In this last one you can clearly see the late plant has nice close knots, the stem is is strong, she’s got small about 4 small branches starting to grow, really looking good!
The plant that broke ground early is much taller, but barely starting to grow her third stage and only has 2 branches started.

With just the 2 first days of difference, you can clearly see the importance of the timing of bringing your plants into the grow house.
So don’t wait for all of them to be ready, get your plants one by one into the room, when their ready.

We’ll upload more pictures in the upcoming days so that you can see the impact further in their lives

How does the auto-flowering plant enter the flowering stage

So since these plants don’t base themselves on the photoperiods, how do these plants know when to get into the flowering stage? We basically just took away their internal clock, so it needs to be replaced.
What did they take? The roots!  As soon as the main root hits the bottom of the pot that’s her signal to start making her sweat buds.
So be careful and don’t make the mistake we did, plant your auto-flowering seeds directly into your flowering pot in order to make sure you don’t have baby plants that start the flowering stage.. like us.

So to recap:

  • The photoperiod is the plants internal clock.
  • Auto-flowering plants start to enter the flowering stage once the main root hits a resistance (bottom of your pot, or blocage in the soil)
  • After germination, get your plant in the flowering pot right away (~11L pots) so that you’re sure that they don’t flower early

What nutrients to give your plants

Auto flower plants don’t need specific nutrients, the trick is really related to knowing in what stage your plant is in more than anything. When I say stage, I’m not talking about the flowering or vegetative stage, it has more to do with the inner stages. Is she close to getting to the flowering stage or do you have time? Should you be adding some potassium or not just yet?
That’s the trickiest part I’ve found so far.

Here’s our advice:

  1. Read up on your strain. Does it generally need a lot of nutrients or is it vulnerable to nutrient burn?
  2. Keep detailed notes of the dates of what you do, especially the dates of ground breaking and transplantation.
    Cross your timeline with the length of your strains life. You should be able to get that info from the person who sold you the seed.
  3. Keep tabs on the evolution of your plant. The best way to know what state she’s in is looking at her and checking her out regularly.
  4. Start adding PK solutions once the roots have invaded the soil.

Alright folks that’s it for this one! Hope this article will save you some headaches and answered all your questions!
If not don’t hesitate to get in touch with us 😉

Until next time, be safe and grow easy

Want updates on new articles, strains and deals ?

About the author

RELATED ARTICLES

Contribute to the shared knowledge base

Share your personal tips, experiences, videos to help the community

MAKE A CONTRIBUTION
Contribute to the shared knowledge base