SCROG Tutorial
All you need to know about the Screen of Green
Welcome to our ScrOG Tutorial!
Here we are going to go in depth on what SCROG is all about. From the definition to the equipment needed, passing by the advantages and a step by step guide, we’ve tried to gather everything we know about this growing technique 🙂 Personally it’s one of my favorite ways of improving yield by using the beauty of the plant.
Before we get into it, here a table of content of the tutorial if you want to jump straight to the part that interests you:
Scrogging Tutorial – Table of Content
Knowledge about the grow technique
Setting up your scrog
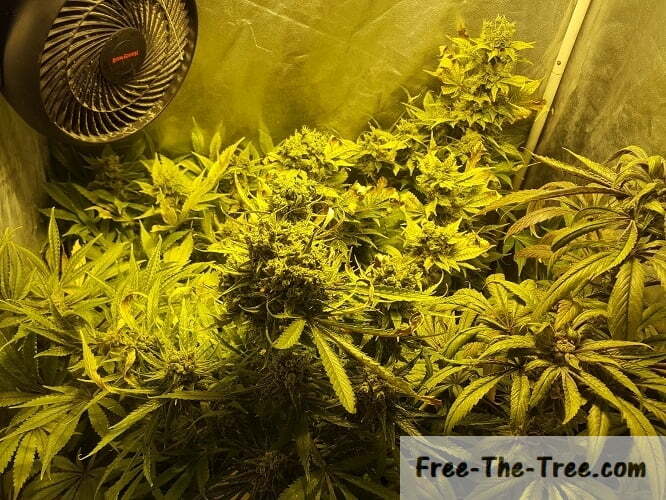
What is SCROG, aka the Screen Of Green ?
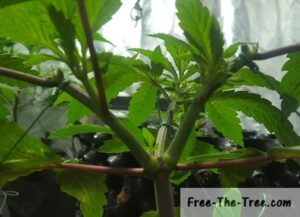
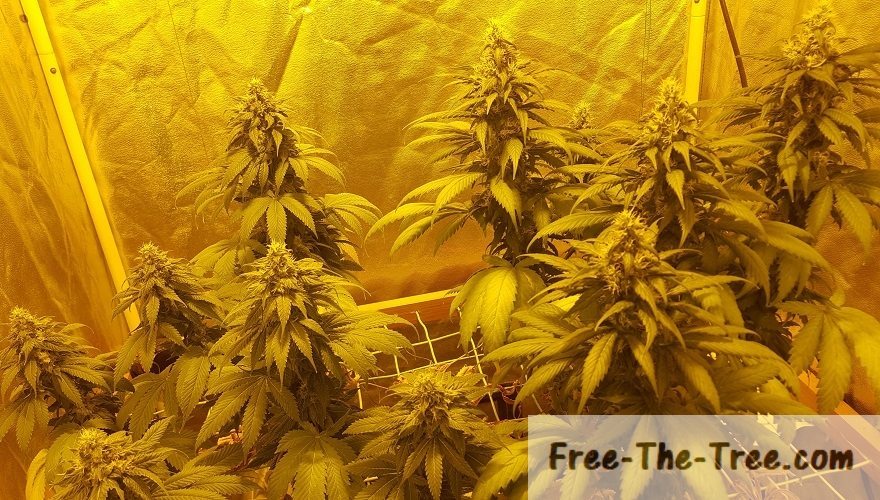
SCROG is the acronym of Screen of Green. This Marijuana cultivation technique allows you to have multiple Apex’s on your plant.
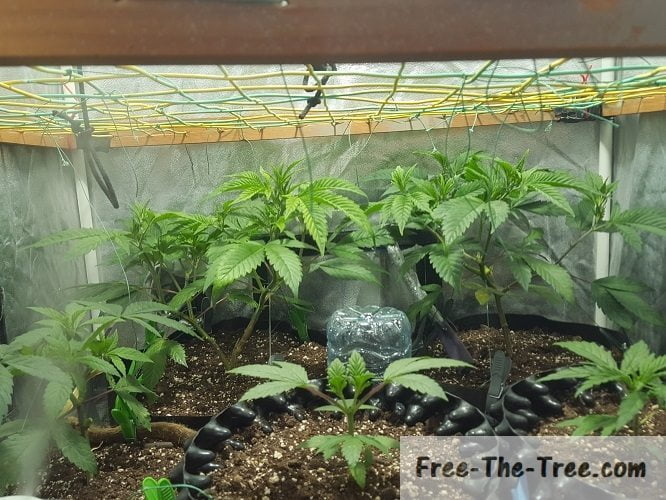
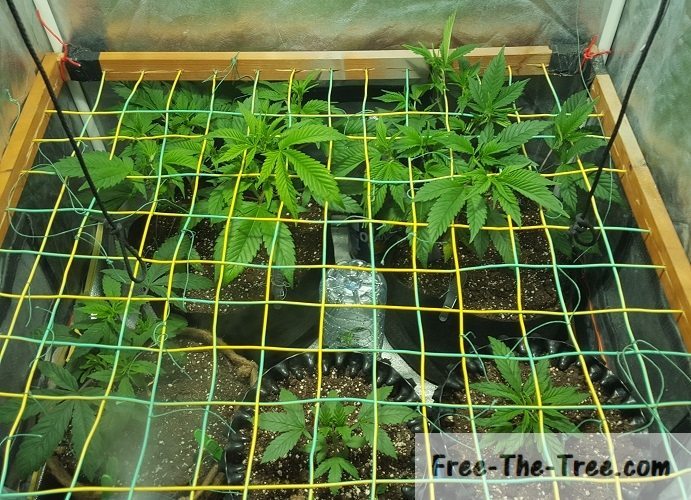
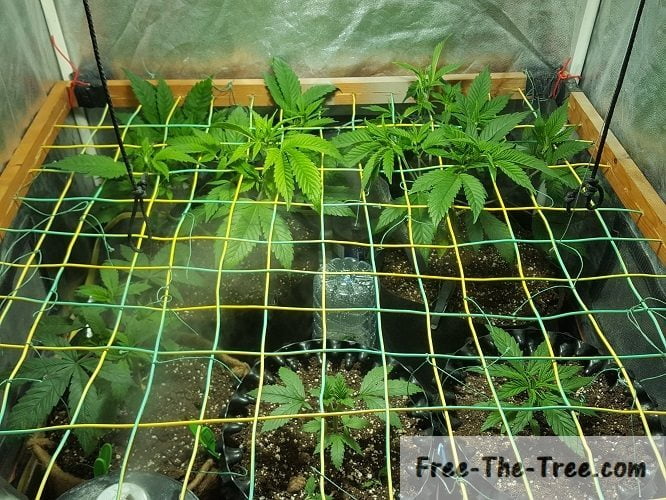
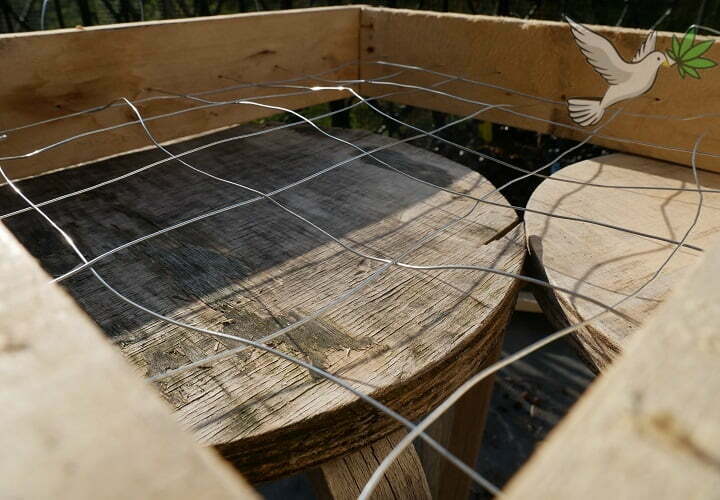
Scrogging is training technique that optimizes light us. The idea is to have a screen over the canopy of your plant, giving the branches a direct source of light.
With more access to light your branches will be able to produce more energy, giving you some nice big buds!
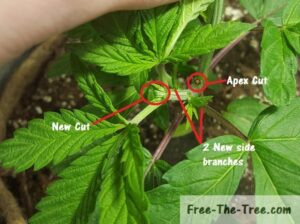
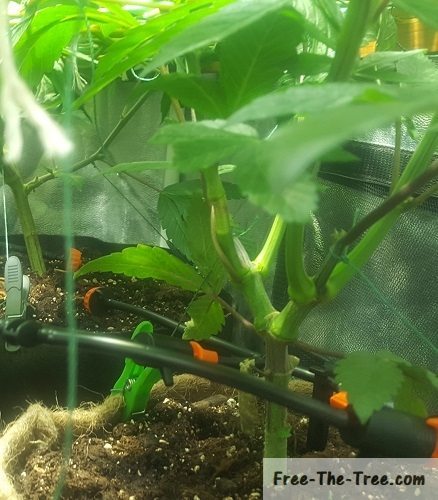
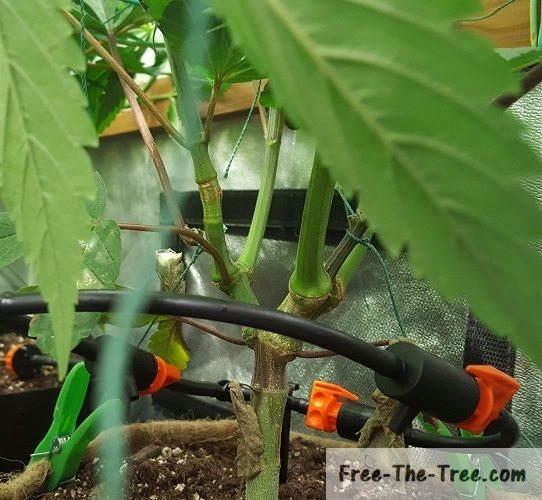
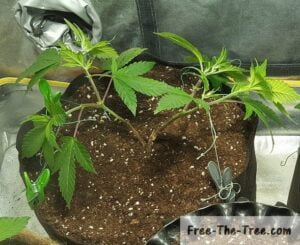
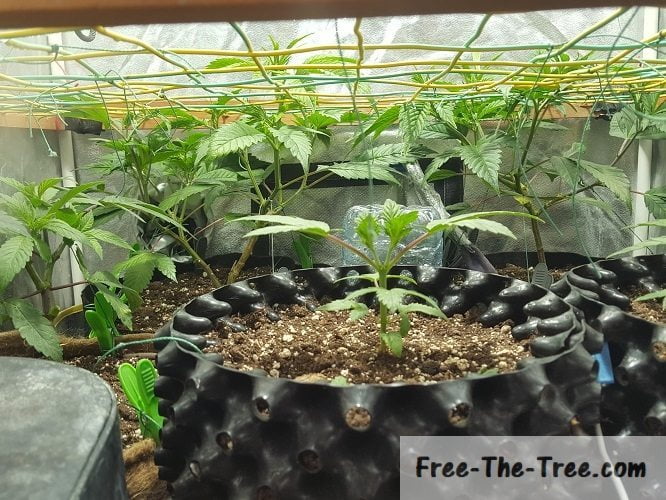
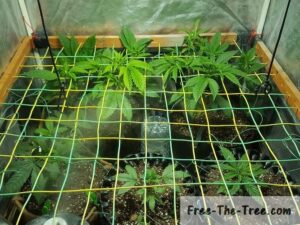
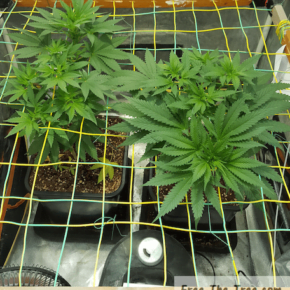
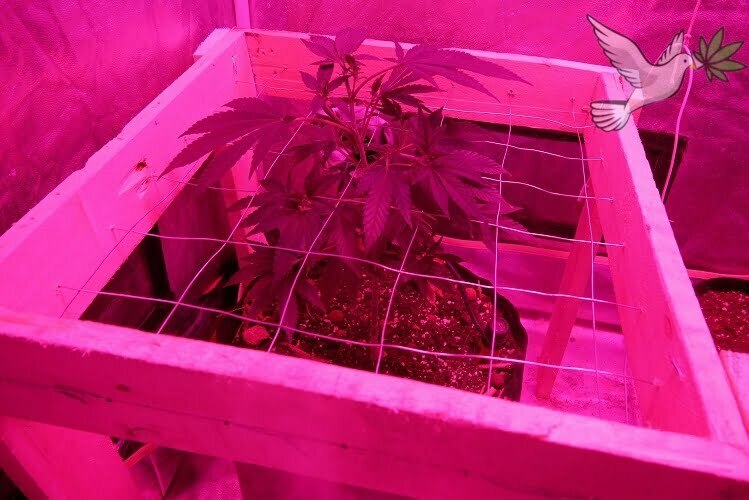
Look at the image on the right, you can see new branches starting to sprout up on the screen.
Those little branches will be full grown flowers soon enough.
Personally SCROG is one of my favorite training techniques, it takes longer to produce but once you get the hang of it you save a lot of time.
Before learning How to set up a Scrog, lets go over the pro’s and con’s of scrogging.
What are the advantages and disadvantages of using the Screen of Green technique?
The pro’s: |
|
The con’s: |
|
When to do a SCROG?
Choosing when to ScrOG can depend on different factors, here’s we’ll cover the major ones.
- You don’t have many plants within your grow room but still want maximum yield.
- Reducing the time needed to take care of your plants is an objective of yours.
- You want to maximize the yield produced by each plant.
- Looking to make some massive plants.
- You’ve heard about it and want to try it out.
Looking around these have been the main reasons why growers choose to go for a Scrog.
Want help finding the perfect strain for you?
Checkout our new strain finder! Add what characteristics you want and let it search though over 2400 strains 🙂 Then compare the results and find where to buy seeds!
Equipment needed for a screen of green
In terms of equipment you don’t really need much, all you need is:
- A screen: Try and have square spacings of about 10cm wide. You can either make it yourself of buy one at a gardening store.
- Large buckets or pots: In order to scrog your plant will need to have a strong root ecosystem during its flowering phase, so don’t hesitate to get her at least in a 10L bucket.
- Scissors or a razor: You’re going to need to trim leafs and branches pretty often, to do so a pair of scissors or a razor is best.
- Clips and/or string: In order to guide your plant you’re going to need to guide the branches on the netting. To do so I find string to be just perfect, not too aggressive for the plant, flexible and allows you to pull it in the direction you want.
How to make you own Scrog net?
Soooo you have all that equipment except for the net? No worries, we had the same situation and turns out, it’s real simple to make 🙂
All you need is couple supplies and some time : we covered all the steps in a full DIY guide over here, we’re just going to go over the main steps here but check out the article for more details
Make the frame
Cutting palet wood
Hammering planks of wood to make the frame
Adding the netting
Using a nail to make wholes
Wires have been weaved into a screen
And voila! You have a screen ready for your Scrog
2 scrog nets ready to use
Scrog net installed and Blue Thai growing on it
How to prepare Marijuana for a SCROG?
In order to have a nice scroggable plant your going to have to train it very early on. The objective of this training is to make the plant stop focusing on her main Apex a bring nutrients in an equal manner to each section. The second target is to start developing the branches early on so that by the time flowering stage comes you’ll have some nice sturdy branches able to handle their weight.
That’s cool on paper, but how to you do this in the real world… here’s a couple easy steps to get this done!
Training Weed for a Scrog Easily
We’re going to show you how to do so with a newly germinated plant and with our Big Buddha Cheese cutting 🙂 so that you can see that it’s simple and generally doable.
We’ll start off with 2 pictures before we started training them, then get into the steps. By the way, if you want to follow the life of these little one’s, check out our weekly grow reports 😉
Step 1 – Pruning the Apex
Once your plant has grown her 3rd stage you’re going to want to cut (prune) the top section of the plant with a pair of clean scissors or a blade.
As we show in the picture below, you’ll want to do this just above the knot, be careful not to damage the side branches that are forming!
In the next step you will be able to see what it the plant will look like without the Apex. If you’re worried about the fact that the Apex is supposed to be her strongest and best bud, don’t worry, you’ll get that bud x10 😉
Step 3 – Prune Tip of the 2 new branches
Now as you can see we waited a little too long to cut the tip of the side branches. Generally you’d want to cut it before the growth of the next stage in order to avoid any waste of energy. With that in mind, we’re still going to keep the 1st stage branches, in time we’ll prune the 2nd stage growths and that top leaf that’s shading the branch.
Step 4 – Let the new sets of branches grow
You should see pretty quickly 2 new branches growing on the knot near the cut and each side.
At this point you’re going to want to let each sprout grow a little before starting to train her. You’ll have 2 options.
The first, prune them again, making a total of 8 branches. The other, letting the grow and placing the screen once they’re tall enough (we cover that further below).
Step 5 – Training the branches
In order to improve the growth of the side branches you need to give them direct access to light. As soon as they are big enough to start creating shade to one another you’re going to need to give them room.
You can do this by attaching and pulling each branch away from the other.
Once you’ve reached this stage you can keep on training your plant, multiplying the number of branches, or start placing your screen and get the branches through for the weaving process, it’s really up to you.
If you decided to keep pruning and training you just need top repeat steps 3 through 5.
Here’s what the stalk of this plant looked like at the middle and end of the vegetative stage
Reading up on scrogging?
Check out our series on the cycle of life of Marijuana (what a beautiful plant)
How to do a Screen Of Green
There are multiple steps to setting up your scrog and as you’ve seen in the steps above the plant training can start early on in the vegetative stage, so make your decision early on!
Let’s cover the steps on how to set up the scrog Method
How to SCROG in 5 easy steps
- Attach your screen
- Prune your leaves and branches
- Guiding your branches horizontally on the screen
- When to start flowering
- SCROG and the flowering stage
Let’s go through these steps with more detail:
1. Setting up the screen for a SCROG
So what you want to do here is get your screen at about 40/50cm (15/20 inches) of the top of your pot, and attach it to the four corners of your grow room. I use metallic string for this (cf image), attached on the 4 corners of the room.
As a safety I also add 3 strings, attached from the top of each side of the room onto the sides of the screen, just in case something happens. Once those branches start invading the screen you don’t want it to move.
Once you’ve done so, here’s what to do:
Screen place in the grow room
Gently Slide the Screen Down
Once your screen is fixed you’re going to want to slide it down so that the plants’ Apex starts to go over the screen. Do this gently, you don’t want to break anything!
The main advantage of doing this is to save some time, since scrogging already strongly extends the vegetative stage, might as well save some where we can right?
Slide the screen down until it reaches the top of the plants and start passing the stems and leaves through each whole.
After this step all the leaves and branches that are touching or nearly touching the screen should be guided towards a hole.
Lower the screen again
At this point you’ll want to do the same thing as the previous step. You should have more branches and leaves that and tall enough to pass or weave through the screen.
On our end we would of liked to lower in tad bit more during this grow but if we did we wouldn’t have enough room to water and all.. So we stopped here, but you can repeat this as much as needed!
2. Pruning your leaves and branches
Once your branches start to reach the screen, it is important for you to cut some of those leaves and branches, here’s an easy way to choose:
- Cut the Leaves: That aren’t receiving light under the screen
- Cut the Branches: That will either take too long to reach the screen or that will cross paths with another branch with more potential.
Here’s the pic of before our prunings:
I know it will hurt and you will be hesitant, but really don’t be, cut everything that isn’t going to produce energy, that take’s the space of another or produces shade over an area.
Your plant will thank you by growing much faster on the top of the screen, where everything has direct contact with the source of light.
3. Guiding your branches horizontally on the screen
Now it’s time to get your plant to fill up the screen. You’re going to want to take your main branches and chose which direction they’re going to go in.
Follow these steps:
- Identify the direction you want each branch to go in. This planning step is important, you want to make sure that each branch has at least one free space to its left, and one to its right
- Bend the top of the branch over the first line and under the next one.
Don’t hesitate to tie down the branch onto the netting so that it holds.
In the first image on the side here you can see how we tied the apex on both nettings in order to pass her under and over the screen. - Cut any leafs making shade to a spot where a branch could come out. You should also cut the branches that are to close to each other. At each not you should have tops 1 branch growing vertically.
- Take a string, on one end tie it around the top of your branch and the other tie it in the direction where you want you plant to go on the screen. Don’t hesitate to pull well on her she can take it.
You can see on the last image of the set how each branch is weaving over and under the screen, as well as the green string pulling them in the direction we want her to go.
Thanks to this technique, with just one plant you can actually fill up a whole grow room! the only thing is that you’ll keep her in a longer vegetative stage.
4. When to start the flowering stage
At the latest, you want to start the flowering stage once your screen is filled up or almost so. You don’t have to wait until it’s full, just don’t wait too long since remember the first 2 weeks is the stretch, and as we’ve seen in our FAQ covering the differences between sativa and indica weeds, the amount of growth during the stretch depends on the strain. With some, the growth can be massive!
With sativas’ you can keep on weaving during the first days, sometime even week, of the stretch. However for indica’s it’s best to have finished before launching.
Here’s a couple pictures ouf our own during the stretch, and a link to the blog post about the start of the SCROG
5. Scrogging during the flowering stage
The Early Flowering Stage – Buds forming
Once you’ve entered the stretch and stopped weaving the plant the process is pretty much the same as with any marijuana plant.
Here’s a couple pictures of our babies once they had started forming their buds, you can see that the they’re still more or less still at the buddlet form at this point.
As always, click on the image for a full view.
Trichomes starting to appear
While the buds keep on fattening up you’ll start noticing a sticky power-like dust on and around your buds called Trichomes. These little guys are produced by the plant for many different reasons, such as defense (unwanted invaders get stuck). In our case they’re interesting because that’s where the THC and CBD will be stored.
Now keep in mind that at this point in time there is no THC what so ever within the plant, if you harvest now you’ll be wasting all your efforts for nothing.
Bud and Trichome development
During the next couple weeks the plant will keep on growing its flowers. You’ll see the pistils go through one, two maybe even 3 rounds of browning pistils. Just sit tight and wait until those trichomes are just right for you, personally we uppers so we go for milky Trichomes, when the THC is at its highest.
If you want some chiller bud, wait until they start to become a brown/golden color, the THC levels will be lower and the CBD will be higher, giving out some chiller effects. Here’s a couple pics of this stage
Choosing the moment when to harvest is really linked to the status of the Trichomes. As we said above, milky trichomes are a sign that the THC levels are at their highest, whereas if you wait a little they will start deteriorating, turning a golden/brownish color. This is a sign that the levels of THC are reducing and the CBD is rising.
Looking to buy cannabis seeds soon?
Check out our strain and price comparison!
In a couple clicks find the perfect strain, compare prices between merchants and get back to growing 🙂
ScrOG FAQ
In this section we’ve gathered the frequent questions asked about scrogging. If you can’t find you answer, don’t hesitate to send a message though here or through our instagram 😉
ScrOG vs SOG
This is a big one, we’ve received many messages from you guys wondering what was better, scrog or a sea of green.
Since they both have their advantages and disadvantages we decided to group them all together so that you can make you own decision.
Screen of Green vs Sea of Green
Comparison | Scrog | SOG |
---|---|---|
Advantages |
|
|
Disadvantages |
|
|
Do I need special Grow Lights?
No, you can go for a scrog with the light system that you usually use within the grow room, although you do need to make that the light covers a wide area in order for the cannabis plant to be covered while growing horizontally.
So think more in light coverage, you can keep the same intensity and spectrum of light.
What does Scrog mean?
ScrOG is a acronym for Screen Of Green which is low stress training technique based on weaving the plants branches on a screen in order to have maximal light exposure.
This will enable your plants to have multiple branches at the same height, developing “multiple Apex’s”.
Can I SCROG with any type of seed?
Technically yes, although it is though with auto-flowering seeds since you can’t control the length of the vegetative stage.
My advice would be to take pre feminized seeds of the strain of your choosing.
Can I SCROG with any strain?
Yes! it is totally possible to scrog with indica or sativa weeds. Although you will adapt a little, the indica strain growing less during the stretch, your vegetative stage will have to be longer.
On the other hand, with sativa weeds you can switch to 12/12 earlier and keep weaving a little while during the stretch phase.
You should also take into account the genetics of the plant and check if it’s known to develop strong side branches and bud sites.
Don’t feel like reading? I Love Growing Marijuana put together a pretty neat video explaining the different steps to scrogging, check it out:
Couple words about the grower
This article was written by Plant Lover, Free the Tree's founder and a passionate grower of Cannabis, as well as all other plants.
Mostly from the city, I work on my computer all day so about 4 years ago, on my off time, I started growing to have some more green in my life.
I never imagined I would fall in love with botany and discover so much about this plant. Since then I keep learning everyday, meeting new awesome people of our community and grow constantly
You can always get in touch with me on our Instagram!
Have you ever scrogged before?
Share your experience and knowledge to help out others in the community!
Looking for growing tips? Check out the articles shared by growers
Check out all our articles & grow reports
Have a question or want to share?